This guide shows how to serve one Powerlynx hotspot location from a pair of MikroTik routers in Active/Standby, so that if the active router dies, the standby takes over in about 3 seconds — clients keep their gateway, get re-authenticated automatically by MAC (no new voucher or access code), and the old RADIUS sessions are closed cleanly in Powerlynx.
Who is this for? Any operator for whom a location must not go dark when a router fails: venues where the hotspot is a paid service and downtime is lost revenue (hotels, campgrounds, event sites), and remote or hard-to-reach sites where a dead router means hours before anyone can physically swap hardware. If you can justify a second router at the site, this setup turns it from a cold spare on a shelf into a hot standby that takes over on its own. Everything below was built and validated in my lab on a hAP ac³ + hAP ac² pair, but the configuration is model-independent — any two MikroTik routers on RouterOS 7 will do, from a hAP up to a CCR2116 pair.
The core idea: Powerlynx identifies a NAS purely by its WireGuard tunnel IP + RADIUS secret. So we give both routers an identical copy of one NAS identity (same WireGuard private key and tunnel IP, same RADIUS client, same hotspot server), and make sure only the current VRRP master keeps that identity active. The master router keeps it permanently enabled; the backup router toggles it with VRRP hook scripts.
Architecture overview
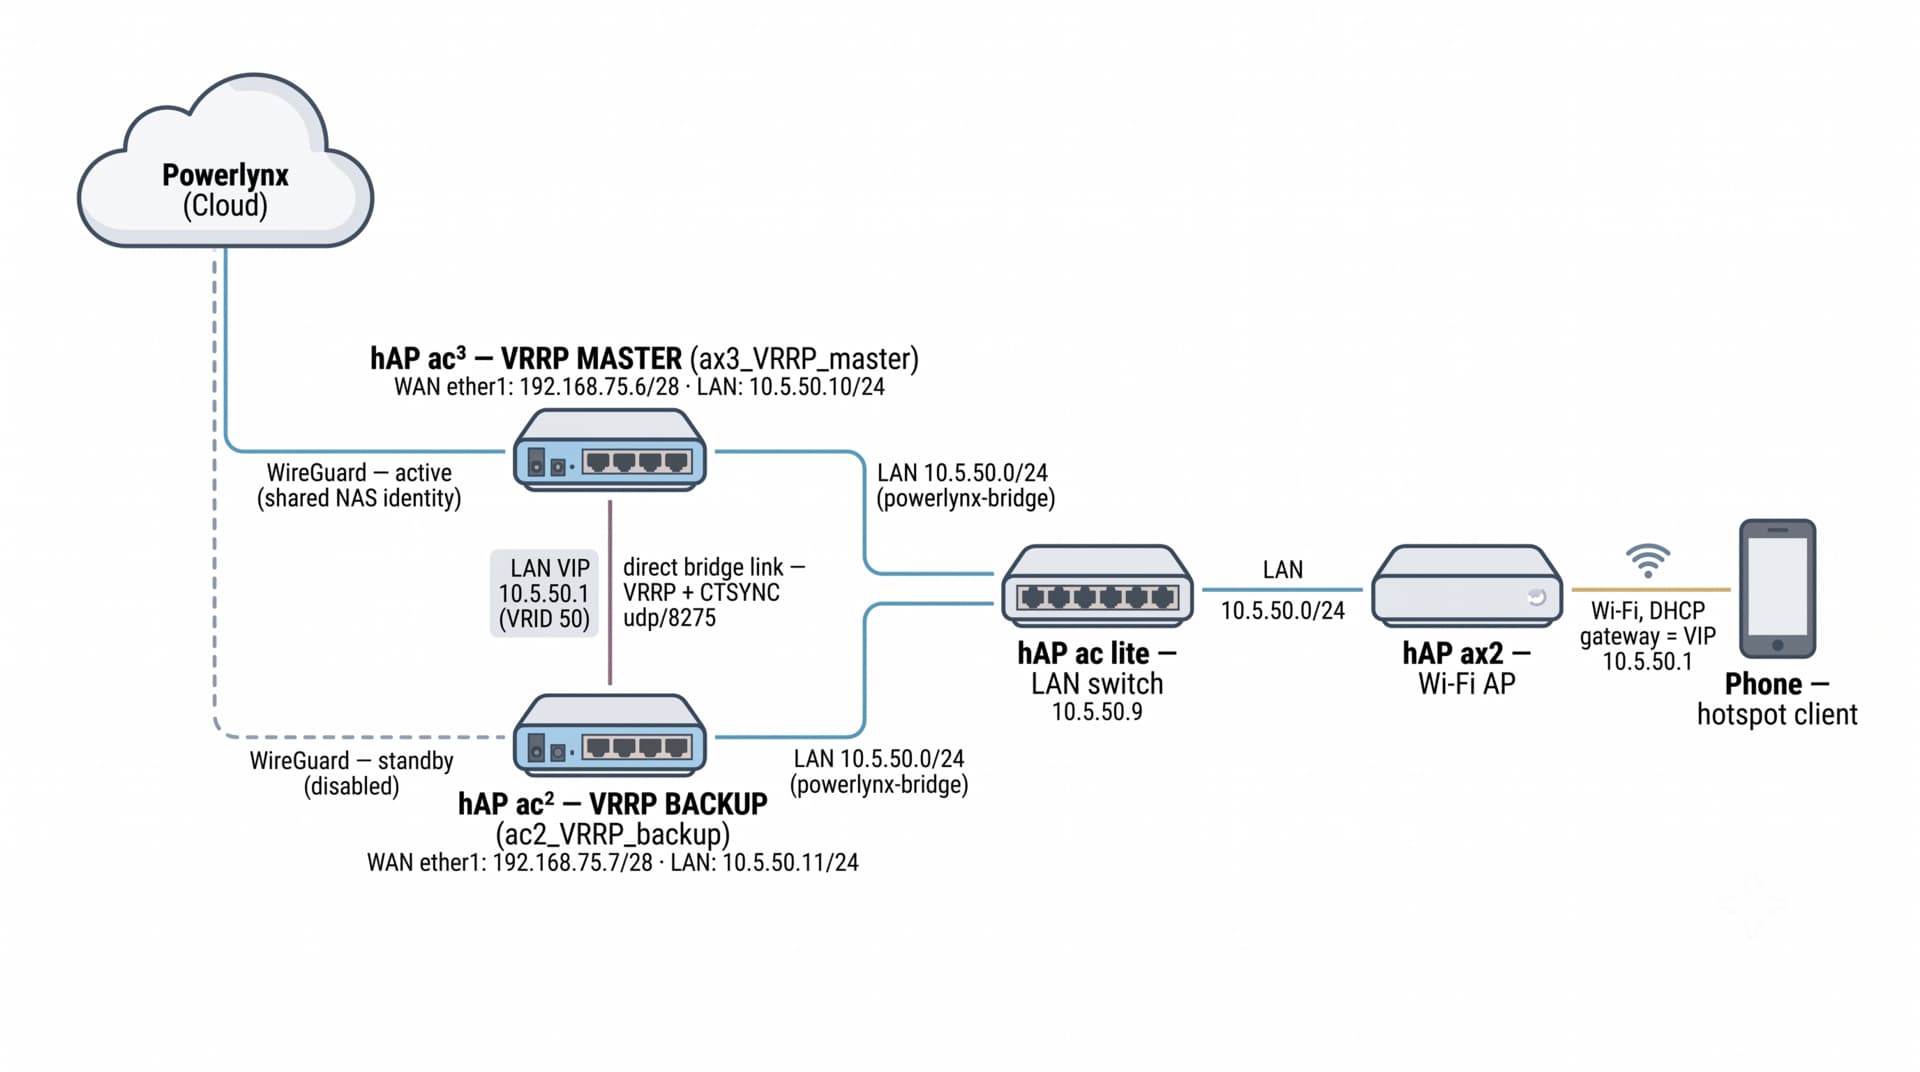
My lab setup (use it as the worked example; substitute your own models and subnets):
| Role | Device | WAN | LAN (powerlynx-bridge) |
|---|---|---|---|
| VRRP MASTER | hAP ac³ ax3_VRRP_master |
ether1, 192.168.75.6/28 (DHCP) | 10.5.50.10/24 |
| VRRP BACKUP | hAP ac² ac2_VRRP_backup |
ether1, 192.168.75.7/28 (DHCP) | 10.5.50.11/24 |
| LAN switch | hAP ac lite | — | 10.5.50.9 |
| Wi-Fi AP | hAP ax2 | — | bridged to the LAN |
| Test client | a phone | — | DHCP from the pair |
-
LAN VIP (client gateway): 10.5.50.1 — owned by whichever router is currently VRRP master.
-
WAN VIP: 192.168.75.12 — optional. This address takes no part in the Powerlynx failover itself: each router reaches the internet through its own WAN address, and the WireGuard tunnel simply roams to the new master’s address after a takeover. The WAN VIP is a convenience — one stable WAN-side address that always points at the current master (handy for remote management or port-forwarding), grouped with the LAN instance so both sides fail over together. If you don’t need that, skip
vrrp75in step 3. -
On each router, the active LAN ports (ether3 + ether4 in my lab) are members of a bridge named
powerlynx-bridge. One bridge port goes to the LAN switch, and one bridge port is a direct cable between the two routers — VRRP advertisements and connection-tracking sync travel over this link. -
Clients and APs hang off the separate switch, never directly off either router — that way the LAN itself survives whichever router goes down.
What each router carries:
-
Both routers: identical Powerlynx NAS identity (WireGuard tunnel, RADIUS client, hotspot server/profile), identical DHCP configuration, VRRP pair with connection-tracking sync.
-
Master only: identity permanently enabled. No toggle scripts — the hotspot is bound to the VRRP interface, so it goes dormant by interface state alone if the master ever loses mastership.
-
Backup only: identity disabled while standing by, plus two scripts wired to the VRRP hooks —
powerlynx-master(enable everything on promotion) andpowerlynx-backup(kick all hotspot users so their Accounting-Stops reach Powerlynx, then disable everything on demotion).
Prerequisites
-
Two MikroTik routers of the same model, both on RouterOS 7 (my lab ran 7.23.1 on the master and 7.22 on the backup; keeping both on the same version is recommended — see the tips in section 10).
-
A spare Ethernet port on each router for the direct inter-router link.
-
Upstream connectivity for both WAN ports in the same subnet (192.168.75.0/28 in my example).
-
A LAN switch and access point(s) independent of the two routers.
-
A Powerlynx account — if you are new to the MikroTik + Powerlynx setup itself, go through the standard MikroTik setup manual first; this guide builds on top of it.
1. Create the location and hotspot in Powerlynx
In the Powerlynx portal, create the location and add one hotspot for it, choosing MikroTik as the router type and WireGuard as the connection type. In my example the location is a single site served by the router pair.
Important: Create exactly one hotspot/NAS record for the pair — do not create one per router. Sessions are attributed per hotspot record, and Powerlynx sends CoA/Disconnect to that record’s tunnel IP; with two records, sessions started on router A would have their disconnects aimed at router A’s dead tunnel after a failover. One shared identity is the whole trick.
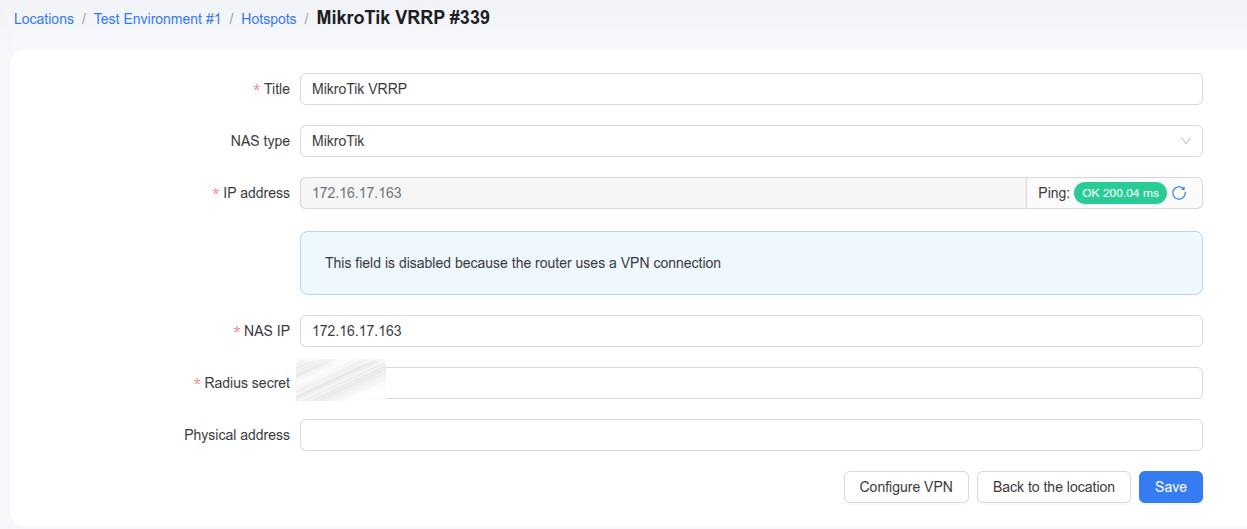
The hotspot record — NAS type MikroTik, the IP field managed by the VPN connection, and the Radius secret you will copy to both routers. (Screenshot taken after the master came online — hence Ping: OK.)
For this setup, do not use the “Full setup” generated script. Instead, open the hotspot’s Simple setup → Setup VPN option: it generates a script that configures only the WireGuard connection — the WireGuard interface with the client private key, the tunnel IP, and the peer to Powerlynx’s VPN server (vpn.powerlynx.app). That script is the core of the shared NAS identity: we will run this same script on both routers in step 5, and configure everything else (hotspot server, RADIUS client, walled garden) manually and identically on both. The same “VPN script, then manual configuration” pattern is used in the MikroTik controller with AP connected via VLAN interface guide.
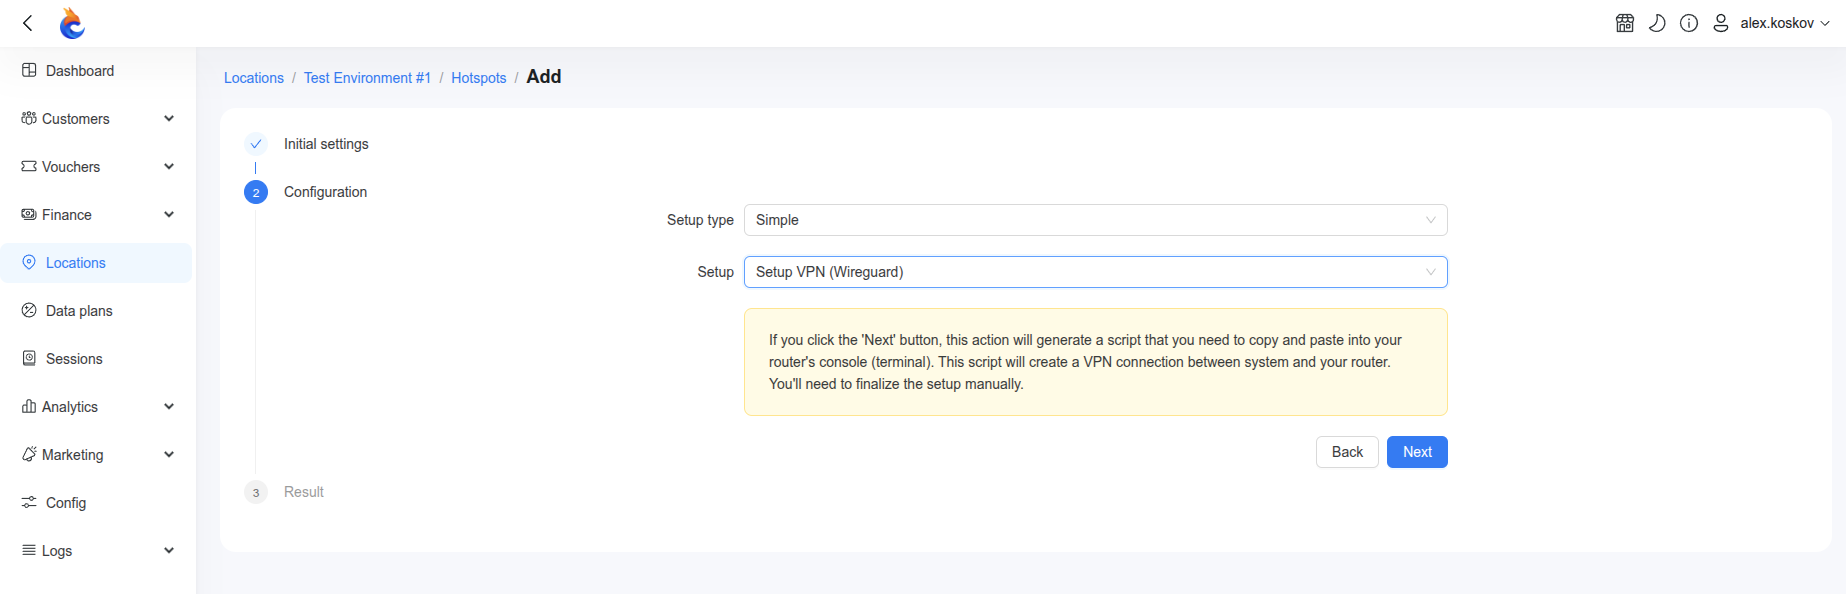
Setup type Simple, Setup Setup VPN (Wireguard) — clicking Next generates the WireGuard-only script.
Also note the RADIUS secret shown for the hotspot in the portal (visible on the hotspot page above) — you will enter it by hand on both routers when configuring the RADIUS client in step 5.
2. Base configuration on both routers
Give the routers distinct identities and build the same LAN bridge on each. On the master:
/system identity set name=ax3_VRRP_master

/interface bridge add name=powerlynx-bridge

/interface bridge port add bridge=powerlynx-bridge interface=ether3

/interface bridge port add bridge=powerlynx-bridge interface=ether4

/ip address add address=10.5.50.10/24 interface=powerlynx-bridge

/ip dhcp-client add interface=ether1
On the backup, the same with its own name and LAN address:
/system identity set name=ac2_VRRP_backup

/interface bridge add name=powerlynx-bridge

/interface bridge port add bridge=powerlynx-bridge interface=ether3

/interface bridge port add bridge=powerlynx-bridge interface=ether4

/ip address add address=10.5.50.11/24 interface=powerlynx-bridge

/ip dhcp-client add interface=ether1
Cabling: on each router, one bridge port to the LAN switch and one bridge port straight to the other router. The routers otherwise keep their standard firewall/NAT configuration.
3. VRRP instances
Two VRRP instances per router, grouped so they fail over together: vrrp50 on the LAN bridge is the authority, and vrrp75 on the WAN follows it via group-authority. (vrrp75 and the WAN VIP are optional — see the architecture notes; if you skip them, drop the vrrp75 lines and the WAN VIP address below.)
On the master:
/interface vrrp

add name=vrrp50 interface=powerlynx-bridge vrid=50 priority=200 interval=1s \

preemption-mode=yes version=2 group-authority=self

add name=vrrp75 interface=ether1 vrid=75 priority=254 version=3 group-authority=vrrp50

/ip address

add address=10.5.50.1/24 interface=vrrp50

add address=192.168.75.12/32 interface=vrrp75
On the backup, identical except for lower priorities:
/interface vrrp

add name=vrrp50 interface=powerlynx-bridge vrid=50 priority=199 interval=1s \

preemption-mode=yes version=2 group-authority=self

add name=vrrp75 interface=ether1 vrid=75 priority=253 version=3 group-authority=vrrp50

/ip address

add address=10.5.50.1/24 interface=vrrp50

add address=192.168.75.12/32 interface=vrrp75
With a 1 s advertisement interval, the backup declares the master dead after ~3 s of silence — that is your failover time. Preemption is on, so a recovered master takes the role back (safely — see the next step).
Check the state in WinBox under Interfaces → VRRP or with /interface vrrp print: the master’s instances carry the M flag, the backup’s the B flag.
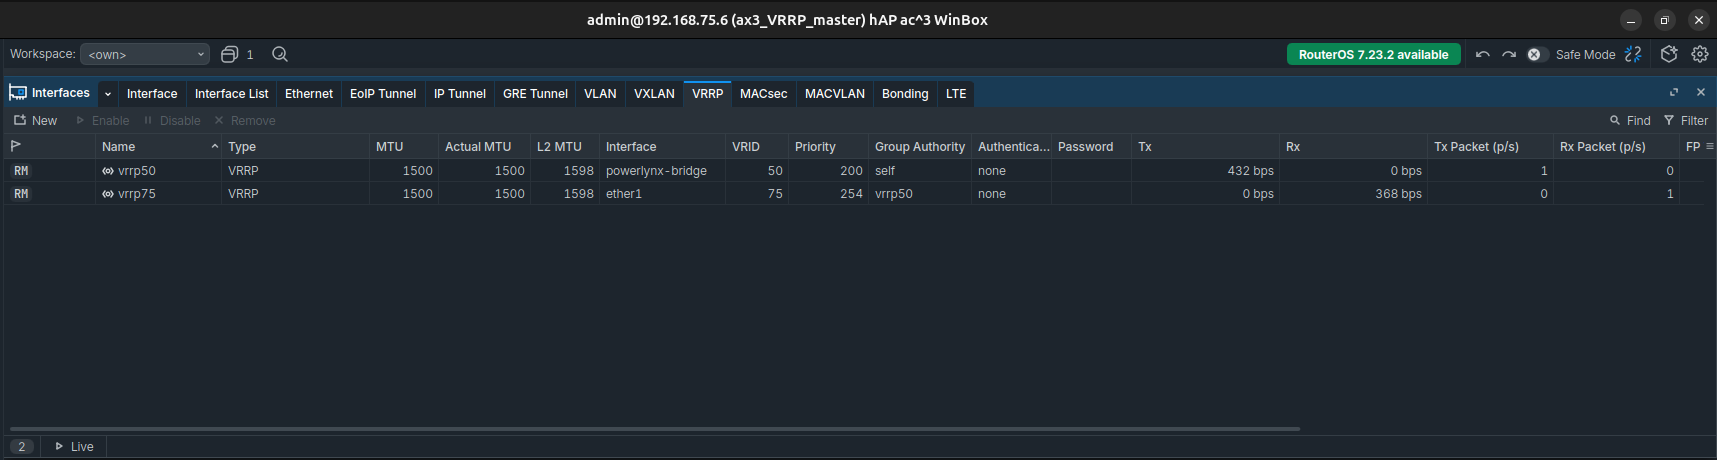
The master — vrrp50 and vrrp75 running with the M flag, priorities 200/254, vrrp75 following vrrp50 as its group authority.
[UPLOAD 06-vrrp-backup-flags.png HERE — drag pictures/06-vrrp-backup-flags.png into the composer and delete this line]
The backup — the same pair standing by with the B flag, priorities 199/253.
4. Connection-tracking sync (CTSYNC)
CTSYNC replicates the connection-tracking table between the routers, so established client connections survive a failover instead of being torn down. It is configured on vrrp50, on both routers, with remote-address cross-pointed at the peer:
On the master:
/interface vrrp set vrrp50 sync-connection-tracking=yes \

connection-tracking-mode=passive-active connection-tracking-port=8275 \

remote-address=10.5.50.11
On the backup:
/interface vrrp set vrrp50 sync-connection-tracking=yes \

connection-tracking-mode=passive-active connection-tracking-port=8275 \

remote-address=10.5.50.10
connection-tracking-portmust be identical on both routers. The MikroTik VRRP documentation says the port should be “unique” — that means unique per VRRP group (relevant for active-active load-balancing setups with several groups), never per router. A mismatched port is the classic way to break this setup — see Troubleshooting.
CTSYNC also changes preemption behavior in a good way: a returning higher-priority router stays BACKUP until it has downloaded the connection-tracking table, and only then preempts. You can watch this in the log — the healthy sequence is:
Waiting for CTSYNC Backup...

CTSYNC Backup ready

Initial CTSYNC complete
5. Replicate the Powerlynx identity to both routers
The NAS identity has two halves — the WireGuard tunnel (scripted) and everything on top of it (manual). Both halves must be identical on both routers.
First, the tunnel. Run the Simple setup → Setup VPN script from step 1 on the master. Do not generate a second script for the other router, and do not let either router use its own WireGuard keypair — Powerlynx’s VPN server knows exactly one peer public key for this hotspot, so a router with its own keypair will never complete the handshake. The script gives both routers the same private key and the same tunnel IP (WireGuard interface powerlynx-wg in my lab).
Verify the tunnel is up from both sides: the hotspot page in Powerlynx shows Ping: OK (see the screenshot in step 1), and the router itself can ping Powerlynx’s RADIUS address across the tunnel:
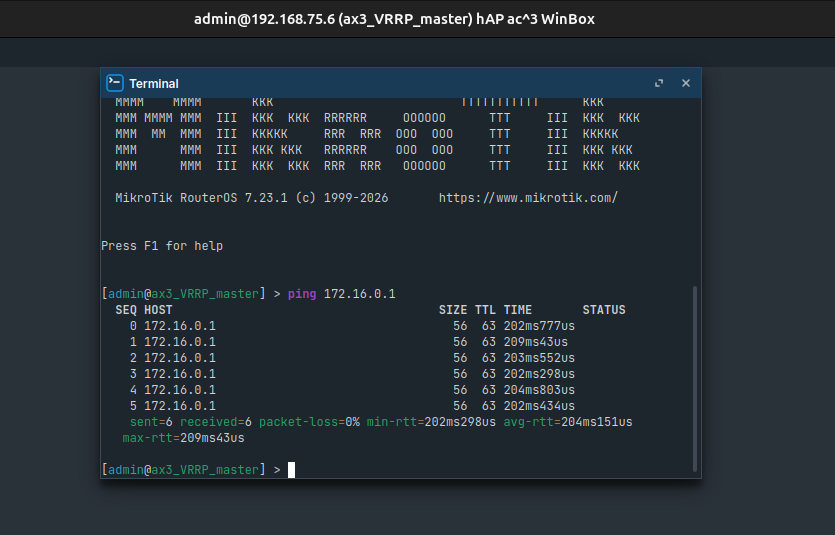
Master router — ping 172.16.0.1 answered across the WireGuard tunnel, 0% loss.
Second, the hotspot on top. Configure the rest manually on the master, following the official Advanced setup manual exactly as you would for a single-router installation:
-
the hotspot server and profile (profile
powerlynxin my lab), including the hotspot files /login.htmlfrom the manual; -
the
/radiusclient — server 172.16.0.1,src-address= the tunnel IP, and the secret shown for the hotspot in the portal (step 1); -
the walled garden entries — follow the manual’s walled-garden section as-is.
The toggle scripts in step 7 find the RADIUS client by comment, so tag the entry:
/radius set [find address=172.16.0.1] comment="Powerlynx radius"
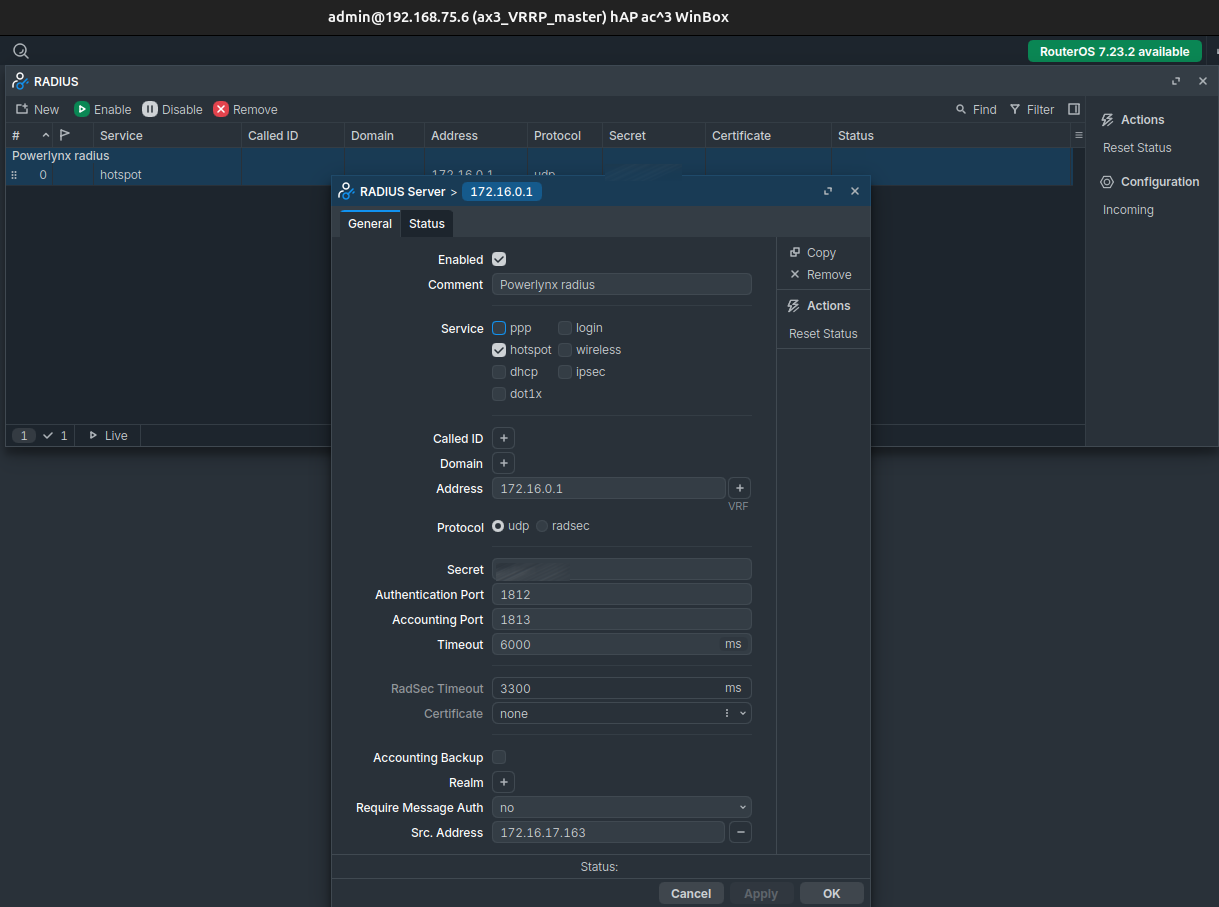
The RADIUS client — address 172.16.0.1, service hotspot, Src. Address = the tunnel IP, comment Powerlynx radius for the toggle scripts.
Then repeat both halves on the backup: run the same Setup VPN script, and redo the manual Advanced-setup configuration with exactly the same values (same profile name, same secret, same walled garden). Right after that, continue straight to steps 6–7 and put the backup’s copy of the identity to sleep — a brief overlap during provisioning is harmless, but you must not leave both routers holding the live identity.
If the VPN script on your routers created the WireGuard interface under a different name than powerlynx-wg, or you named the hotspot profile something other than powerlynx, note the names and adjust the [find ...] clauses in steps 6–7 accordingly.
Warning: The imported Setup VPN script remains stored under
/system scripton each router — with the WireGuard private key in plaintext. Once both routers are provisioned, check/system script printand remove it on both routers.
6. Bind the hotspot and DHCP server to VRRP
This step is what makes the master’s side of the design script-free: bind the hotspot server and the DHCP server to vrrp50 instead of the bridge. A VRRP interface is only “running” while its router is master — so the backup’s hotspot portal and DHCP server are dormant by interface state alone.
On both routers, adjust what the hotspot setup created (names may differ on yours — check with print first):
/ip hotspot set [find profile="powerlynx"] interface=vrrp50 addresses-per-mac=1

/ip pool set [find] ranges=10.5.50.12-10.5.50.254

/ip dhcp-server set [find] interface=vrrp50

/ip dhcp-server network set [find address=10.5.50.0/24] gateway=10.5.50.1 dns-server=<your DNS list>
The DHCP design in detail:
-
One DHCP server per router, bound to
vrrp50— only the current master ever serves leases. On the backup the server shows theIflag, “Interface not running” — that is expected and correct, not an error. -
The DHCP server address is the VIP on both routers. Because the server sits on
vrrp50, which carries 10.5.50.1, the server identifier that clients talk to at renewal is 10.5.50.1 no matter which router is active — a client renews against the same server IP before and after a failover. This would not be true with the server on the bridge: each router would then answer as its own address (.10 / .11), and renewals would target a server that may be gone. -
Shrink the pool to exclude infrastructure IPs. The default pool created during hotspot setup usually covers the whole subnet (e.g. .2–.254). Exclude the VIP (.1), both routers’ own LAN addresses (.10 / .11), the LAN switch (.9), and any statically-addressed APs — hence my example range 10.5.50.12–10.5.50.254.
-
Identical pools on both routers, with the gateway handed out being the VIP 10.5.50.1. After a failover the client re-REQUESTs its current address during the DHCP exchange and typically keeps it, so identical pools mean no address churn. RouterOS DHCP conflict detection (on by default) additionally probes each address by ARP/ICMP before assigning it, guarding against duplicates. (A split-pool variant exists — see the tips in section 10.)
-
The DNS server list must be identical on both routers — a mismatch here gave me “connected, no internet” after failover during testing.
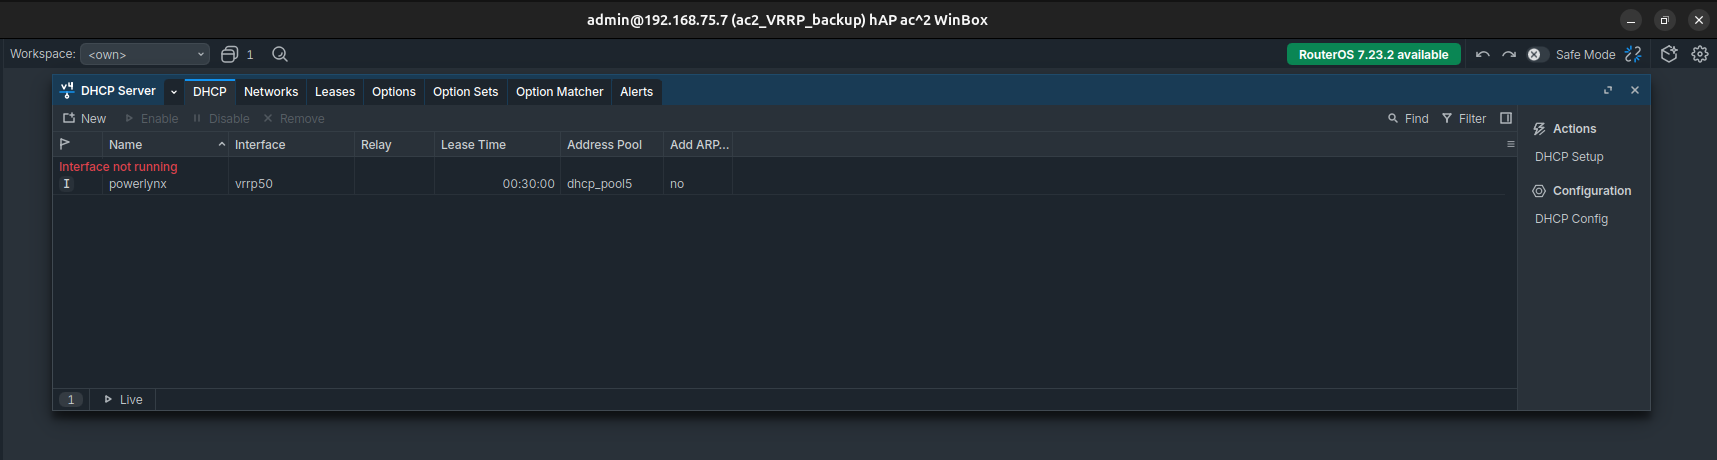
The backup’s DHCP server bound to vrrp50 — flag I, “Interface not running”. Expected and correct while standing by.
IP bindings — reaching the switch, APs and the peer router through the hotspot
Your infrastructure devices (the LAN switch, the APs) live behind the hotspot too, and without help their management UIs would be stuck at the login portal. A bypassed IP binding excludes a device from hotspot login entirely, so it stays reachable for remote management. Bindings apply per-router, so add them on both routers:
/ip hotspot ip-binding add mac-address=<switch MAC> type=bypassed comment="LAN switch - management"

/ip hotspot ip-binding add mac-address=<AP MAC> type=bypassed comment="AP - management"
The routers themselves need the same treatment. While one router holds the hotspot, its partner’s LAN address (10.5.50.10 / 10.5.50.11) sits behind that hotspot like any other client — without a binding, WinBox/SSH to the standby router from the hotspot LAN gets stuck at the portal. So bypass each router on its peer — on the master, the backup’s bridge MAC; on the backup, the master’s:
# on the master

/ip hotspot ip-binding add mac-address=<backup bridge MAC> type=bypassed comment="peer router - management"

# on the backup

/ip hotspot ip-binding add mac-address=<master bridge MAC> type=bypassed comment="peer router - management"
(Take the MAC from /interface bridge print on each router — the powerlynx-bridge MAC address.)
Operational trick — who served this page? I deliberately gave the two routers different hotspot-profile DNS names: vrrp.hotspot on the master and vrrp2.hotspot on the backup. The hostname in the client’s browser then instantly tells you which router served the login page. This is harmless: Powerlynx identifies the NAS purely by tunnel IP + RADIUS secret; per the MikroTik HotSpot docs, dns-name is only the local login-page hostname (RouterOS adds a static DNS entry for it automatically).
# master

/ip hotspot profile set [find name="powerlynx"] dns-name=vrrp.hotspot

# backup

/ip hotspot profile set [find name="powerlynx"] dns-name=vrrp2.hotspot
7. Put the backup to sleep: toggle scripts and VRRP hooks
The master gets no scripts at all — its identity stays permanently enabled, and its hotspot follows the VRRP interface state automatically. All toggling lives on the backup.
Add both scripts on the backup:
/system script add name=powerlynx-backup policy=read,write,test source={

/ip hotspot active remove [find]

:delay 10s

/ip hotspot disable [find profile="powerlynx"]

/radius disable [find comment="Powerlynx radius"]

/interface wireguard peers disable [find interface="powerlynx-wg"]

/interface wireguard disable [find name="powerlynx-wg"]

:log info "VRRP -> BACKUP: sessions stopped, radius + wg + hotspot disabled"

}

/system script add name=powerlynx-master policy=read,write,test source={

/interface wireguard enable [find name="powerlynx-wg"]

/interface wireguard peers enable [find interface="powerlynx-wg"]

/radius enable [find comment="Powerlynx radius"]

/ip hotspot enable [find profile="powerlynx"]

:log info "VRRP -> MASTER: wg + radius + hotspot enabled"

}
Wire them to the VRRP hooks on vrrp50 (backup router only):
/interface vrrp set vrrp50 on-master="/system script run powerlynx-master"

/interface vrrp set vrrp50 on-backup="/system script run powerlynx-backup"

/interface vrrp set vrrp50 on-fail="/system script run powerlynx-backup"
/system script run powerlynx-backup
This also puts the backup’s identity into its dormant state (WireGuard + peer + RADIUS + hotspot disabled), which is exactly how it must stand by.
{ }blocks exactly as above, or enter the scripts through the WinBox System → Scripts fields.
Why the script order matters
RouterOS sends a RADIUS Accounting-Stop when a session hits its time limit, when an admin removes it from /ip hotspot active (Acct-Terminate-Cause 6, Admin-Reset), and when the VRRP-bound hotspot interface goes down at demotion (Acct-Terminate-Cause 2, Lost-Carrier) — all of this verified live in my lab with RADIUS counters and packet captures. But a Stop can only be delivered while the RADIUS client and the WireGuard tunnel are still up.
That is why powerlynx-backup does things in this exact order: kick all users first, wait 10 seconds so the Stops leave the box, and only then disable the transports. My first version disabled RADIUS first — the Stops never left the router, and the sessions lingered on Powerlynx for ~10 minutes until its automatic stale-session closer ended them. With the order above, sessions close in Powerlynx at the moment of handover.
The trade-off: during the 10 s drain window both routers briefly hold the shared WireGuard identity, so the tunnel endpoint may flap once and the new master’s first authentication may retry — harmless in practice.
And the hard-crash case: if the master loses power or crashes outright, no Accounting-Stops can be sent at all. For a short while you will then see “dead” sessions on the Powerlynx side — sessions still listed as active in the portal that no longer exist on the NAS. Don’t worry and don’t close them by hand: Powerlynx monitors the sessions and closes stale ones automatically after a narrow period (~10 minutes with MikroTik accounting defaults). Usage is never double-counted either way.
8. Failover test walkthrough
Time to break things on purpose.
Baseline. Connect the test client (my phone) to the hotspot Wi-Fi, go through the portal and log in. Verify the session on the master and in Powerlynx:
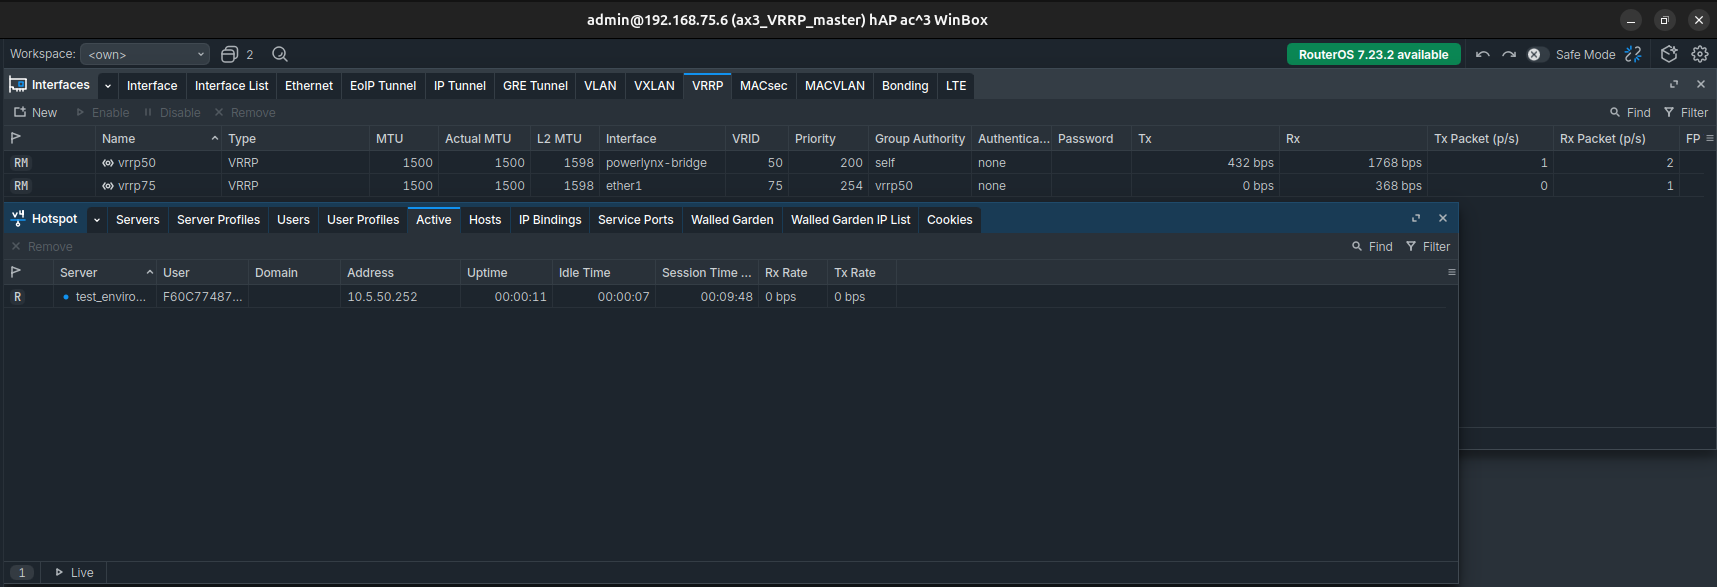
Baseline on the master — the test client logged in under IP → Hotspot → Active, VRRP still holding the M flags above.
Note the portal hostname in the browser — vrrp.hotspot, so the master served it.
Failover. Power off the master (or pull its cables — any hard failure works). Within ~3 seconds the backup promotes: vrrp50/vrrp75 flip to master, the on-master hook runs powerlynx-master, and the WireGuard tunnel re-handshakes from the backup (same key, new source — the endpoint roams). Watch the backup’s log.
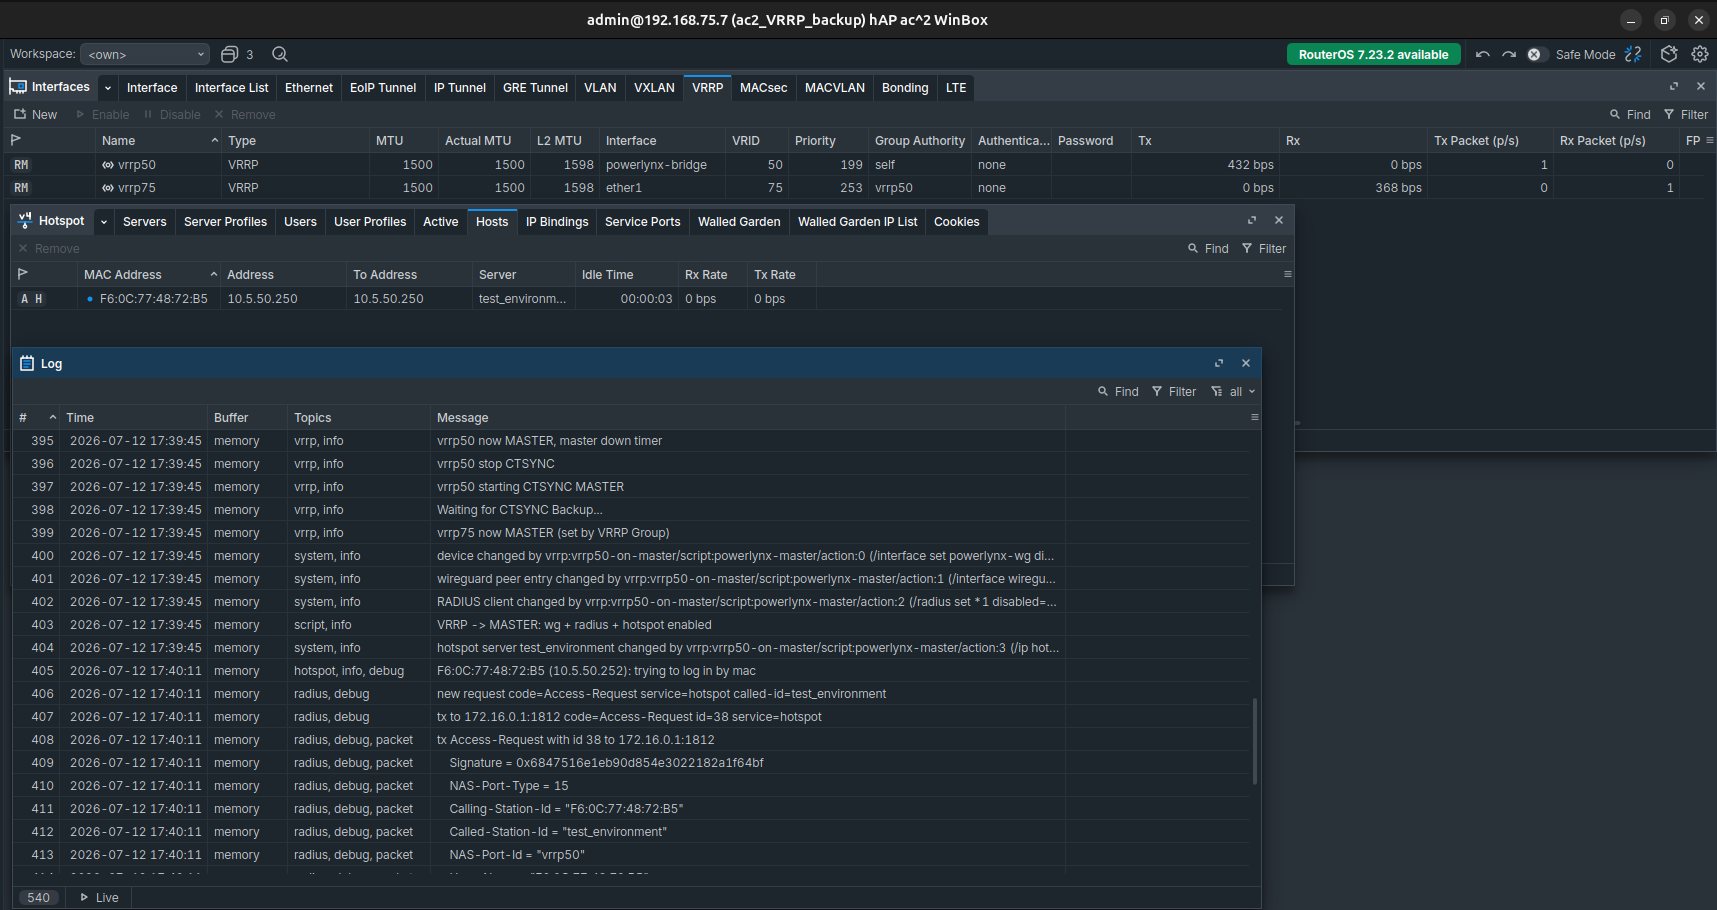
The backup promoting: vrrp50 now MASTER → CTSYNC takeover → the on-master hook enabling WireGuard, RADIUS and the hotspot (VRRP -> MASTER: wg + radius + hotspot enabled) → the client re-logging in by MAC and its Access-Request leaving for 172.16.0.1.
What to expect on the client and in Powerlynx:
-
The phone keeps its IP and gateway (VIP), established connections survive via CTSYNC, and the hotspot re-authenticates it by MAC automatically — same subscriber data, no new voucher.
-
In Powerlynx the NAS shows Ping: Unreachable for a few seconds during the WireGuard re-handshake, then recovers.
-
Open the portal page again: the hostname is now
vrrp2.hotspot— the backup is serving.
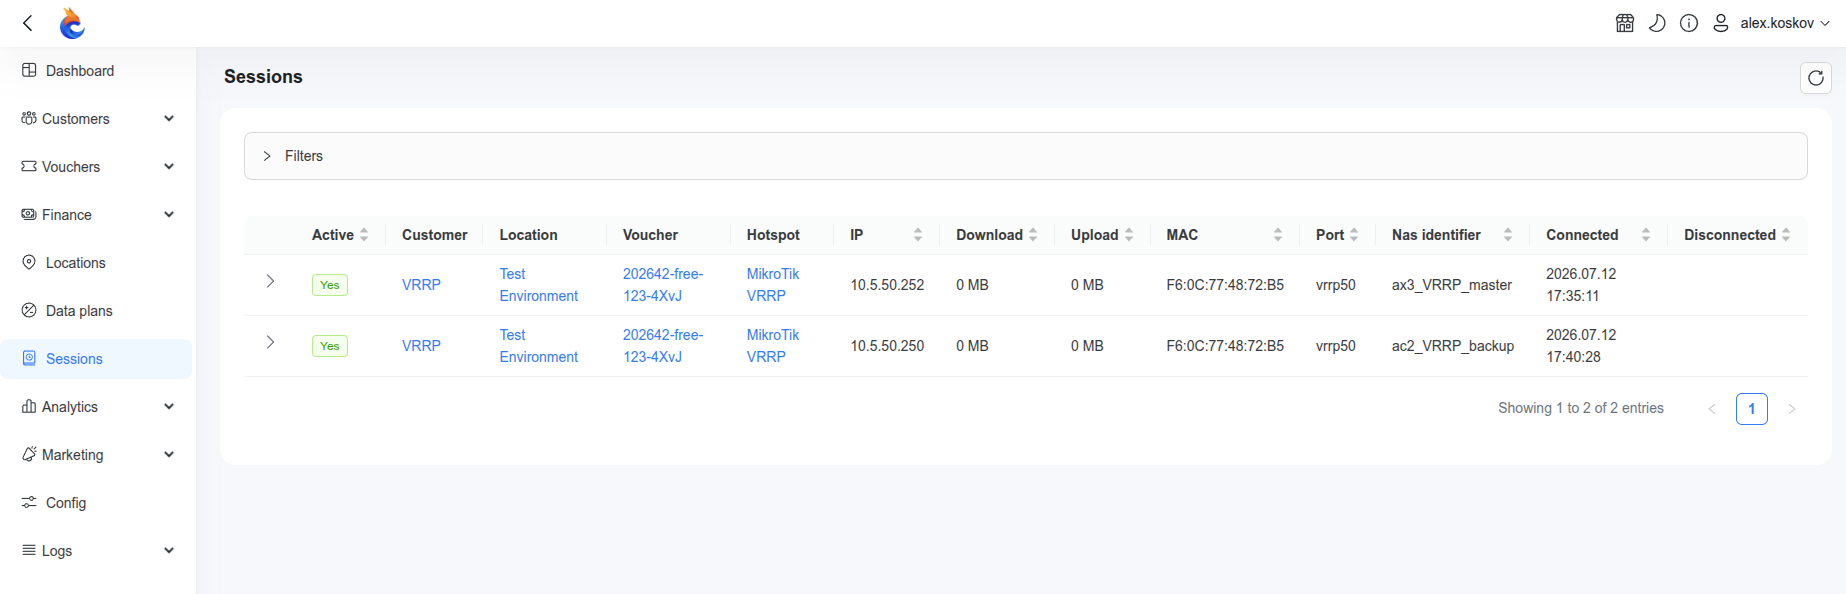
Powerlynx sessions list right after the failover — the same client appears twice: the stale session from ax3_VRRP_master (closes automatically within minutes) and the live one from ac2_VRRP_backup. Note the Nas identifier column telling the two routers apart.
Failback. Power the master back on. It comes up, stays in the BACKUP role until CTSYNC finishes downloading the connection table (watch for the Initial CTSYNC complete log line), then preempts. On the now-demoted backup the on-backup hook runs powerlynx-backup: all actives are kicked, their Accounting-Stops are delivered during the 10 s drain, and the identity goes dormant again. In Powerlynx you can watch the sessions from the backup close at that moment.
9. Failover UX and honest caveats
What I observed across repeated tests:
-
VIP takeover: ~3 s. Clients keep working through CTSYNC-synced connections.
-
Re-authentication is MAC-based and automatic against the same subscriber data — nobody re-enters a voucher or access code.
-
Caveat: occasionally a client had to reconnect to the Wi-Fi manually before it was re-authenticated. Be upfront about this with your users.
-
Caveat: the Powerlynx UI shows the NAS Ping: Unreachable for a few seconds during the WireGuard re-handshake — expected, self-healing.
-
Caveat: for a few minutes after a hard failover the same client may show a duplicate “active” session — the stale one from the dead router plus the live one. Purely cosmetic; it closes automatically and there is no billing or usage impact (usage is never double-counted).
10. Troubleshooting & useful tips
Useful tips
-
Keep both routers on the same RouterOS version. My lab ran 7.23.1/7.22 without issues, but identical versions remove a whole class of “works on one, not the other” surprises.
-
Split DHCP pools if duplicate leases worry you. Instead of identical pools, give each router a disjoint half (e.g. master 10.5.50.12–133, backup 10.5.50.134–254). This removes any possibility of duplicate assignment, at a cost: after a failover, client IPs change at the next lease renewal. With identical pools plus RouterOS conflict detection (on by default) I did not need this.
-
“Dead” sessions on the Powerlynx side are self-healing. After a failover you may see sessions still listed as active in Powerlynx that no longer exist on the MikroTik NAS. Don’t worry and don’t clean them up by hand — Powerlynx monitors sessions and closes stale ones automatically after a short period (~10 minutes with MikroTik accounting defaults), with no billing or usage impact.
-
WireGuard is not mandatory. The same design works with the other connection types — OpenVPN, IPsec, or a plain public/static IP. The real requirement is simply that Powerlynx can reliably reach your NAS at one stable address: that address plus the RADIUS secret is the shared identity you replicate to both routers. I validated WireGuard in the lab; with a public-IP connection the WAN VIP naturally becomes that stable address.
-
Active/active with VLANs is possible. Nothing limits the pair to one active router. Split the LAN into VLAN segments and create one VRRP group per segment with crossed priorities — router A is master for one segment while router B is master for another, each backing the other up. Each segment then carries its own hotspot + NAS identity, toggled per group exactly as in this guide. Remember that
connection-tracking-portmust be unique per VRRP group in such a setup (see step 4). -
Why
group-authorityon the WAN instance. A grouped VRRP member never sends its own advertisements — only the authority does (per the MikroTik VRRP docs). Sovrrp75followsvrrp50’s election instead of running its own on the ISP-facing port: LAN and WAN always fail over together, no VRRP multicast reaches the ISP segment, and there is no VRID or virtual-MAC interaction with whatever redundancy protocol the ISP runs there. -
Don’t block Powerlynx’s ping. The hotspot’s online indicator in the portal is a plain ICMP ping from Powerlynx — over WireGuard it arrives from 172.16.0.1. If your input firewall drops it, the hotspot shows unreachable even while everything else works. A firewall that plays well with Powerlynx is covered in Recommended MikroTik firewall configuration.
Troubleshooting
A returning router is stuck in BACKUP forever; the other logs Waiting for CTSYNC Backup... endlessly.
Cause: connection-tracking-port mismatch between the routers — the sync channel never establishes, and preemption waits for a sync that will never complete. Fix: set the identical port (8275 in this guide) on both.
Both routers show MASTER (split-brain).
Recognize it in Interfaces → VRRP: M flags on both boxes. Recover by bouncing VRRP on the router that should be backup — /interface vrrp disable [find], wait a few seconds, enable again — or simply reboot it. If a re-enabled backup re-promotes itself within seconds, take the inter-router bridge ports out of hardware offload:
/interface bridge port set [find interface=etherX] hw=no
The backup briefly promotes during recabling / reboots / link flaps.
Any advertisement gap longer than ~3 s promotes the backup — that is VRRP working as designed. The design must tolerate transient dual-master moments; they resolve on their own once adverts flow again (and the recovery above covers the case where they don’t).
Clients can’t get an IP address / stuck obtaining a lease.
Look for a rogue third DHCP server on the hotspot LAN (a factory-default AP or switch is the usual culprit). It wins the offer race against the VRRP pair and breaks clients. Only the two routers may serve DHCP on this LAN.
Can ip-binding type=bypassed protect VRRP? — No.
Bypassed IP bindings are exactly the right tool for reaching managed devices behind the hotspot (the switch, the APs, the peer router — see the bindings subsection in step 6), but they do not apply to VRRP advertisements: adverts are multicast from the virtual MAC and never instantiate a hotspot host, so a binding is never consulted for them. If you ever hit split-brain, use the recovery procedure above — don’t expect bindings to prevent it.