For customers using MikroTik devices as hotspot controllers:
Please share your feedback, questions, or recommendations on how to configure the firewall on a MikroTik device to help avoid potential issues with the hotspot.
For customers using MikroTik devices as hotspot controllers:
Please share your feedback, questions, or recommendations on how to configure the firewall on a MikroTik device to help avoid potential issues with the hotspot.
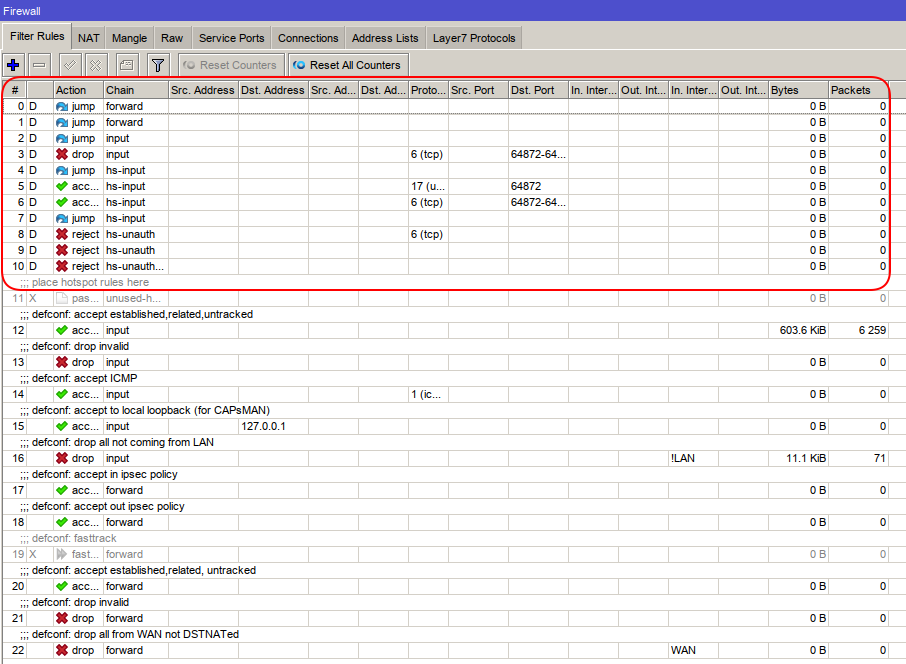
If you’re using the default configuration on your MikroTik device, be aware of the pre-configured IPv4 firewall rules.
/ip firewall {
    filter add chain=input action=accept connection-state=established,related,untracked comment="defconf: accept established,related,untracked"
    filter add chain=input action=drop connection-state=invalid comment="defconf: drop invalid"
    filter add chain=input action=accept protocol=icmp comment="defconf: accept ICMP"
    filter add chain=input action=accept dst-address=127.0.0.1 comment="defconf: accept to local loopback (for CAPsMAN)"
    filter add chain=input action=drop in-interface-list=!LAN comment="defconf: drop all not coming from LAN"
    filter add chain=forward action=accept ipsec-policy=in,ipsec comment="defconf: accept in ipsec policy"
    filter add chain=forward action=accept ipsec-policy=out,ipsec comment="defconf: accept out ipsec policy"
    filter add chain=forward action=fasttrack-connection connection-state=established,related comment="defconf: fasttrack"
    filter add chain=forward action=accept connection-state=established,related,untracked comment="defconf: accept established,related,untracked"
    filter add chain=forward action=drop connection-state=invalid comment="defconf: drop invalid"
    filter add chain=forward action=drop connection-state=new connection-nat-state=!dstnat in-interface-list=WAN comment="defconf: drop all from WAN not DSTNATed"
}
Some of these default rules can interfere with proper Hotspot operation.
To ensure your Hotspot works correctly:
Use this MikroTik command to disable FastTrack:
/ip firewall filter disable [find where comment~"defconf: fasttrack"]
If you’re using the Simple setup, verify that the script correctly inserts the Hotspot rules at the top of the firewall filter list.
If you’re using the Advanced setup, you should do the same manually.
If for some reason the Hotspot rules were added below or between other rules:
action=passthrough chain=unused-hs-chain comment="place hotspot rules here" to the top of the listaction=passthrough chain=unused-hs-chain comment="place hotspot rules here" disabled=yes
After adjusting the firewall order and disabling FastTrack, your Hotspot should function properly with RADIUS and Powerlynx.
This issue can be related to either the RADIUS configuration or firewall filter rules.
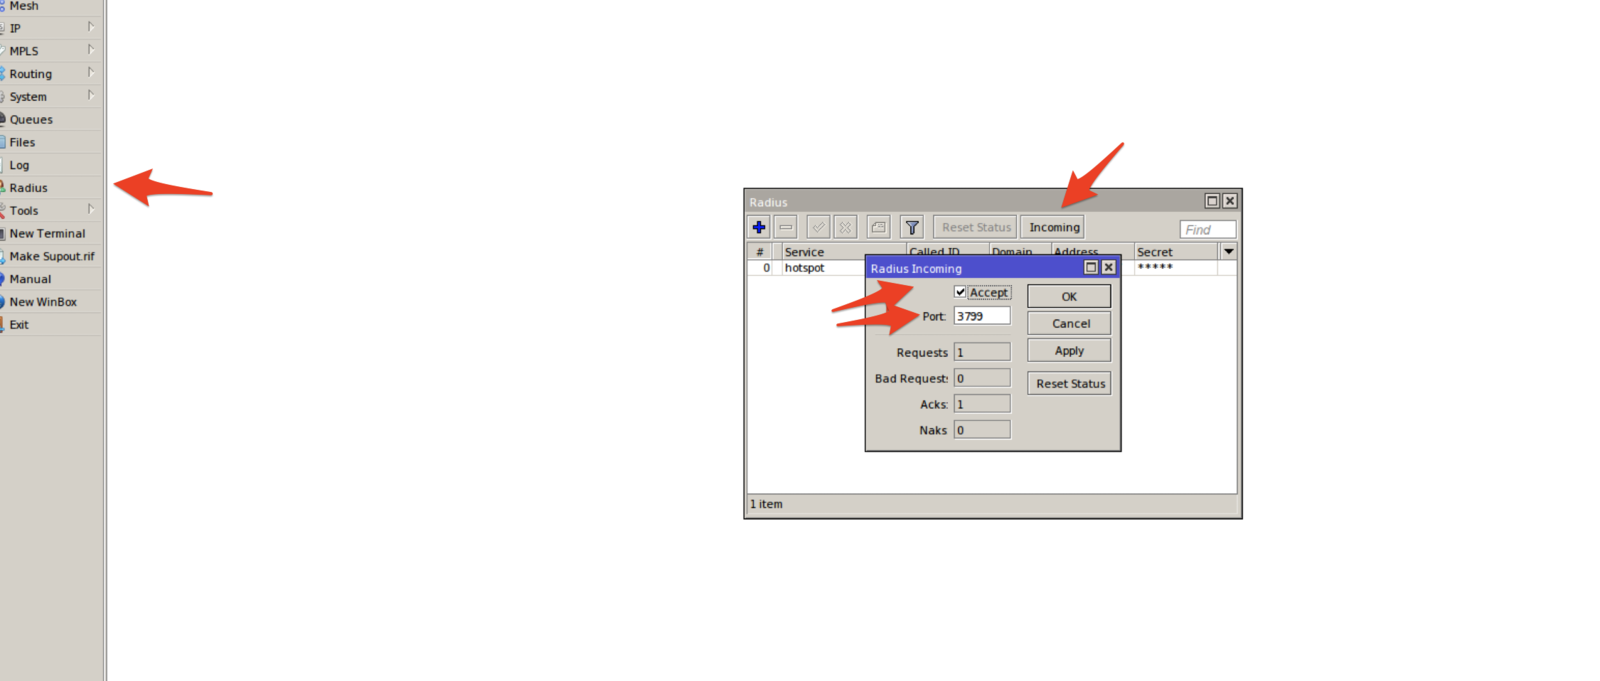
First, ensure that RADIUS is enabled on your MikroTik router.
Go to RADIUS settings, click on the Incoming button, and enable it.
If RADIUS Incoming is enabled, the next step is to check your firewall configuration.
Note: RADIUS operates over the UDP protocol, which is connectionless and stateless. This means it does not guarantee delivery, and unfortunately, it’s not possible to determine from logs why a specific packet wasn’t received.
Check your INPUT chain—does your router drop traffic from the 172.16.0.0/12 or 10.0.0.0/8 networks?
Some firewall rules may block traffic from bogon IPv4 ranges, which include these subnets. Powerlynx uses these ranges for VPN connectivity:
172.16.0.1)10.112.0.110.112.0.2172.16.0.110.112.0.2139.84.237.27Example for Wireguard connection:
/ip firewall filter
add action=accept chain=input comment="Powerlynx RADIUS incoming accept" src-address=172.16.0.1 protocol=udp dst-port=3799  place-before=0
Example for OpenVPN connection:
/ip firewall filter
add action=accept chain=input comment="Powerlynx RADIUS incoming accept" src-address=10.112.0.2 protocol=udp dst-port=3799  place-before=0
Example for public IP address connection:
/ip firewall filter
add action=accept chain=input comment="Powerlynx RADIUS incoming accept" src-address=139.84.237.27 protocol=udp dst-port=3799  place-before=0
-After applying these firewall rules, test the connection again to confirm whether the issue is resolved.
If you want to make your MikroTik device more secure, you might consider using a rule like this:
/ip firewall filter

add action=drop chain=input comment="bottom drop" disabled=yes
This rule drops all incoming traffic on the input chain from any source across all interfaces. However, this also prevents redirection to the Splash Page and blocks access to essential services.
To safely use such a rule, you must allow traffic from the following hosts on the WireGuard/OpenVPN and WAN interfaces to maintain connectivity with the Powerlynx infrastructure:
/ip firewall address-list

add address=172.16.0.0/12 list="allowed pool"

add address=10.112.0.0/16 list="allowed pool"

add address=64.227.114.153 list="allowed pool"

add address=157.230.77.58 list="allowed pool"

add address=5.101.109.44 list="allowed pool"
Allowing these hosts ensures that users can obtain a voucher from a free data plan.
These IPs are essential for Powerlynx services and must be allowed through your firewall.
Allowing these hosts is critical for the following features to work properly:
Free Data Plan access
Login using Voucher Code
If you plan to let customers purchase vouchers through payment gateways (e.g. PayPal, Stripe and etc), you also need to allow access to additional hosts associated with those services.
Here are some common entries used in the Walled Garden (this is not a complete list):
/ip hotspot walled-garden
add dst-host=*.digitaloceanspaces.com
add dst-host=*paypal*
add dst-host=*betacdn.net
add dst-host=*.powerlynx.app
add dst-host=*.akamaiedge.net
These entries use wildcards to allow access to broader domains hosted on content delivery networks (like Amazon, Azure, or Google Cloud).
Important: These hosts should be added to both the Walled Garden and the Firewall.
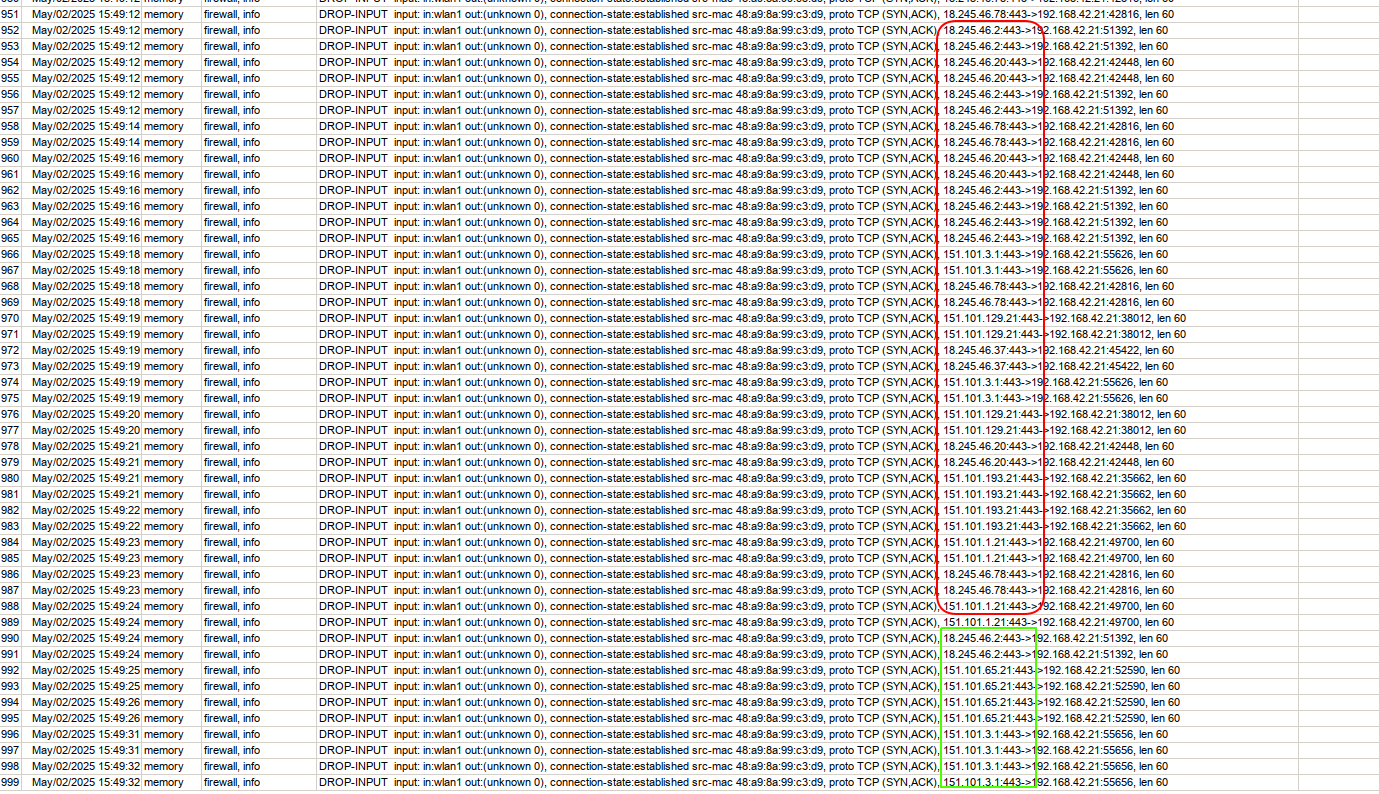
To identify which connections are being blocked, you can temporarily enable logging:
/ip firewall filter
add action=log chain=input comment="Log remaining input before drop" log=yes log-prefix="DROP-INPUT "
This helps identify which protocols, ports, and source addresses attempted to send traffic to your router on the ‘INPUT’ chain, and this information may help you reconfigure your router’s firewall.
Therefore, at a minimum, you need to allow input chain traffic from hosts related to the Powerlynx infrastructure, as well as from hosts associated with your payment gateway. This is essential for the hotspot to function correctly if you intend to use a drop rule.
As an alternative, you can review your firewall filter rules for security and consider reconfiguring them. As a basic reference, you can check the default MikroTik firewall filter configuration.
/ip firewall {
                       filter add chain=input action=accept connection-state=established,related,untracked comment="defconf: accept established,related,untracked"
                       filter add chain=input action=drop connection-state=invalid comment="defconf: drop invalid"
                       filter add chain=input action=accept protocol=icmp comment="defconf: accept ICMP"
                       filter add chain=input action=accept dst-address=127.0.0.1 comment="defconf: accept to local loopback (for CAPsMAN)"
                       filter add chain=input action=drop in-interface-list=!LAN comment="defconf: drop all not coming from LAN"
                       filter add chain=forward action=accept ipsec-policy=in,ipsec comment="defconf: accept in ipsec policy"
                       filter add chain=forward action=accept ipsec-policy=out,ipsec comment="defconf: accept out ipsec policy"
                       filter add chain=forward action=fasttrack-connection connection-state=established,related comment="defconf: fasttrack"
                       filter add chain=forward action=accept connection-state=established,related,untracked comment="defconf: accept established,related, untracked"
                       filter add chain=forward action=drop connection-state=invalid comment="defconf: drop invalid"
                       filter add chain=forward action=drop connection-state=new connection-nat-state=!dstnat in-interface-list=WAN comment="defconf: drop all from WAN not DSTNATed"
                     }
In this configuration:
Make sure hotspot dynamic rules are located at the top of your firewall rule list. Otherwise, other rules may interfere with hotspot functionality. (Refer to the previous topic for more details.)